
Ahh, noise gates. By far the sexiest part of music production.
Yeah… not so much. But, they are really important. In this blog post, I’ll go over:
- What exactly noise gates do
- Why they’re so important for keeping your mix clean
- Each parameter of a noise gate (and how to adjust it)
- A step-by-step guide to properly setting up your noise gate
Let’s go!
Table of Contents
What is a noise gate?
A noise gate is a device that is used to control the level of an audio signal. It’s a way to automatically reduce the level of background noise in a recording or live performance.
Noise gates are commonly used in studios and live venues to cut out buzzes, hums, and hisses from various sound sources.
Noise gates are so named because they function as a gate that “opens” and “closes” to let sound in (or cut it off) based on a set of predetermined parameters.
Why is a noise gate important?
Noise gates are important because they help to control or eliminate unwanted background noise in a recording or live performance.
By reducing the level of ambient noise, they can help to make the recording or performance sound more focused and clearer.
Noise gates can also be used to create special effects, such as making a sound appear to fade in or out, sidechaining, or gated reverb (which we’ll get into in a later section).
What are all the parts of a noise gate?
There are four main parts to a typical noise gate:
- Input: where the signal being processed enters the gate.
- Threshold: the level at which the gate will open and allow the signal to pass through.
- Release: the amount of time it takes for the gate to close after the signal has dropped below the threshold.
- Output: where the signal leaves the gate after it has been processed.
Here is a screenshot of the built-in gate plugin that comes with Logic Pro X:
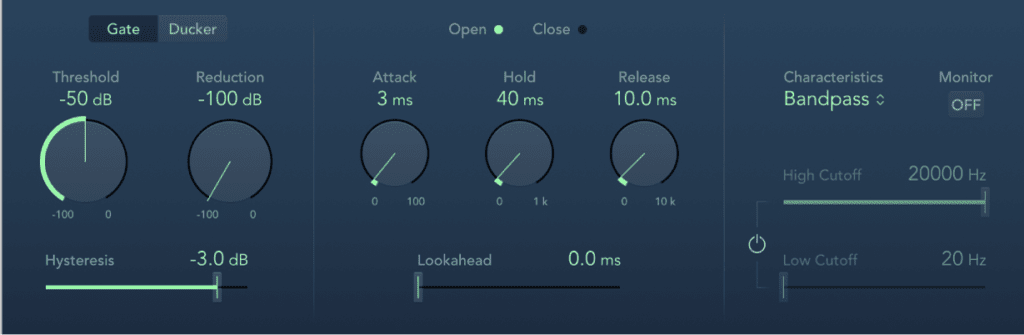
As you can see from the photo, this particular noise gate plugin has many more features than the four listed above.
This is common in most modern noise gates, which often include the following features:
- Pre-open or lookahead: a brief period before the gate opens, during which the signal is allowed to pass through. This can be used to avoid cutting off the beginning of a sound.
- Hold: the amount of time the gate will stay open after the signal has dropped below the threshold.
- Attack: the amount of time it takes for the gate to open after the signal has exceeded the threshold.
- Range: the difference between the highest and lowest level that the gate will allow the signal to pass through.
- Mix: the ability to blend the processed signal with the unprocessed signal.
- Invert gate (ducking): This feature, shown as “Ducker” in the photo above, allows you to invert the gate to produce a ducking effect. Ducking in audio is when the level of one sound is lowered in response to the level of another sound. This can be used to create a sidechain compression effect, where the signal being processed is lowered in level whenever the sidechain signal (usually a kick drum) exceeds the threshold.
- Lowpass / Highpass filters: These are used to filter out low or high frequencies from the signal before it enters the gate. This can be useful for reducing rumble or hiss from a recording, or for removing unwanted frequencies from a live performance.
What are some common applications for noise gates?
Some common applications for noise gates include:
- Reducing background noise in a recording or live performance (such as the buzz of an electric guitar or bleed from drum mics)
- Creating special effects, such as making a sound appear to fade in or out
- Filtering out low or high frequencies from a signal
- Controlling the level of one sound in response to another sound (sidechain compression)
How does a noise gate work?
A noise gate works by attenuating (reducing the level of) a signal when it falls below a certain threshold.
The gate will open and allow the signal to pass through when the signal exceeds the threshold, and then close again when the signal drops below the threshold.
The amount of time it takes for the gate to open and close is determined by the attack and release settings.
The attack time can be viewed as how abrupt the effect is. If the attack time is short, the sound will suddenly cut off when it dips beneath the threshold, or “burst out” of the gate when it exceeds the threshold. This can be a bit jarring, especially with vocals.
If the attack time is slow, the gate will gradually allow the sound to come through, resulting in a sort of fade-in effect.
You can also mix the wet (gated) signal with the dry (unprocessed) signal to create a more subtle effect.
What instruments should I use a noise gate on?
A noise gate can be used on any instrument or sound source that produces a signal that falls below the threshold.
This includes electric guitars, acoustic instruments (such as drums or piano), and even vocals. But just because you can use a noise gate on any instrument certainly does not mean you should.
One common use for a noise gate is to reduce bleeding from drum mics. By placing a gate on each mic, you can attenuate the signal when the drums are not being played, and allow the signal to come through when they are.
For example, a snare drum is quite loud relative to other instruments on a drum kit (or even on a stage).

To avoid the signal of other nearby sound sources (such as hi-hats or toms) from bleeding into the snare mic, many producers will place a noise gate on the snare mic with a decently high threshold.
That way, the snare mic will only “open up” when it hears that resounding CRACK! of the snare drum.
This can help to clean up a recording or live performance and make it easier to hear each drum in the mix.
Are there any pitfalls to using a noise gate?
Yes, there certainly are. One of the most common problems with using a noise gate (and other dynamic plugins like a compressor) is what’s known as “pumping and breathing.”
Pumping and breathing is when the gate produces an audible pumping sound, usually during quiet sections or when the signal level is close to the threshold.
I hear this all the time on podcast vocals and it drives me insane. It’s extremely fatiguing to the ears and usually comes from well-meaning audio producers slapping a noise gate or aggressive compressor on everything.
One way to help reduce pumping and breathing is to use an EQ before the noise gate. Many dynamic or condenser mics have a sensitive low-end response.
That means anytime a podcaster or vocalist bumps the table or picks up the sound of an A/C unit kicking on, the signal can spike (and thus affect the gate or compressor).

By attenuating the low frequencies, you can make it less likely for the gate to open and close unnecessarily.
You can also try using a softer knee setting, or even an expander rather than a noise gate.
An expander is similar to a noise gate, but instead of completely attenuating the signal, it simply reduces the level by a certain amount. This can help to avoid that sudden “bursting out” sound that can happen with a noise gate.
So, those are some things to keep in mind if you’re thinking about using a noise gate. As with any effect, it’s important to use it tastefully and only when necessary. Otherwise, you run the risk of ruining your recording or performance.
Noise gate plugins
Noise gate plugins are available for both digital audio workstations (DAWs) and standalone hardware units.
Popular DAWs such as Pro Tools, Logic, and Ableton Live all come with native noise gate plugins that are more than adequate for most applications.
There are also many high-quality third-party noise gate plugins available from companies such as Waves, Izotope, FabFilter, and Universal Audio.
Noise gate pedals
Since electric guitars are particularly prone to hum and noise, there is a bevy of noise gate pedals available for guitarists to include on their pedalboards.
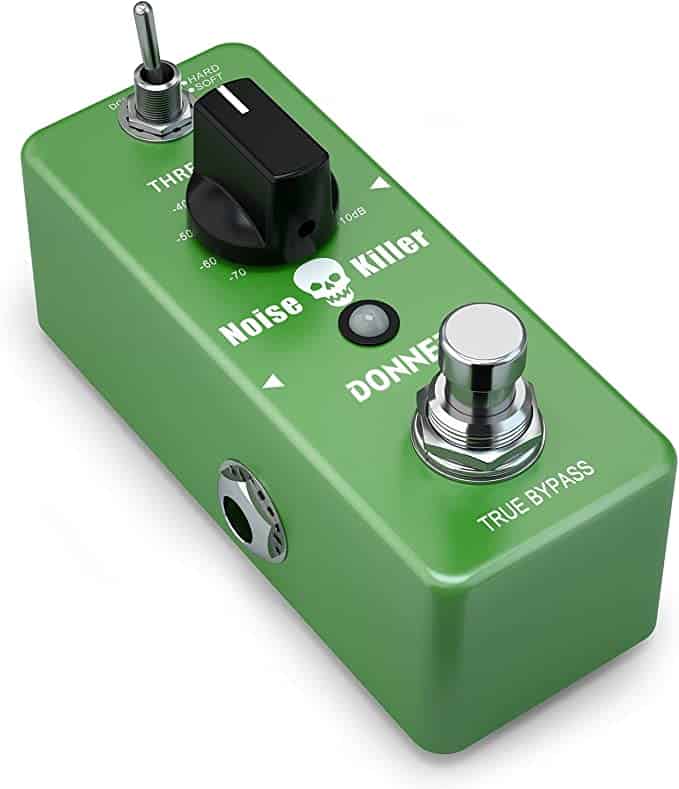
The Donner Noise Gate “Noise Killer” pedal is a crazy affordable option with a delightfully small form factor. It’s stupid simple, with a single knob to dial in your threshold, a toggle switch to adjust the attack time from “hard” to “soft,” and a bypass switch.
The MXR Smart Gate Noise Gate is another popular – albeit pricier – choice. It’s got a no-nonsense design with a single knob to adjust your trigger range and a toggle switch to target hiss (high frequencies) or the full frequency spectrum.

For what it’s worth, you don’t need to break the bank on a noise gate pedal. Most folks can’t even tell the difference between various types of distortion, much less if you’re using a $30 vs. a $300 noise gate.
My recommendation would be to look up some YouTube demonstration videos and get the cheapest possible option (and I wouldn’t say that about all gear).
Where should you put your noise gate in the signal chain?
The general rule of thumb is to put your noise gate last in the signal chain, after all of your other effects pedals.
That way, the gate will only open when it hears the signal from all of your other pedals. If you put the noise gate first in the signal chain, it may open and close unnecessarily.
Plus, it’s often the added distortion on guitars that causes the noise, so placing the noise gate pedal before the distortion in the signal chain defeats the entire purpose.
A step-by-step guide to setting up your noise gate settings
While the noise gate guitar pedals are often simple, noise gate plugins are often… not.
It’s overwhelming to open up a noise gate plugin and see a dozen different knobs and faders. Where do you begin?
While every sound source (and the target effect) will be different, here’s a step-by-step guide that will help you set up your noise gate for most applications.
Step 1: Adjust your threshold so that you’re attenuating some of the signal
Play through your sound source and slowly raise or lower the threshold until you’re attenuating the part of the signal that you want to remove. We will return to this later, but it’s important to hear the effect in action as we adjust each parameter.
Step 2: Set your attack
Once you’ve set your threshold, we now need to fine-tune how the noise gate reacts when you reach that threshold. The attack time determines how quickly the noise gate opens after it hears a signal above the threshold.
If you set the attack too slow, the noise gate will open too late and you’ll hear some of the unwanted noise before it’s attenuated. If you set the attack too fast, you may hear a clicking sound as the noise gate opens and closes.
As a general rule of thumb, you want the attack time to be as fast as possible without introducing any unwanted clicks or artifacts. Keep replaying the sound source and adjusting the attack until you find that sweet spot.
Step 3: Set your release
The release time is how long the noise gate stays open after the signal drops below the threshold.
If you set the release too slow, the noise gate will stay open even after the signal has dropped below the threshold and you may start to hear some artifacts. If you set it too fast, the noise gate will close too quickly and you may hear a clicking sound.
As with the attack time, you want to find the sweet spot where the noise gate is staying open just long enough to attenuate the unwanted noise.
Step 4: Go back to your threshold and make any final adjustments
Now that you’ve got your attack and release times set, go back to your threshold and make any final adjustments.
You may find that you need to readjust your threshold now that the noise gate is opening and closing at the right times. Or you may find that you don’t need to attenuate as much of the signal now that the noise gate is working correctly.
And that’s it! Those are the three main parameters you need to adjust on most noise gate pedals and plugins.
Of course, every sound source is different so you may need to experiment with the different settings to find what works best for you. But this should give you a good starting point.
Using a noise gate creatively
Producers invent some of the coolest sounds when they use tools “incorrectly.” A noise gate is no exception.
Here are some interesting and outside-the-box ways you can use a noise gate in your productions.
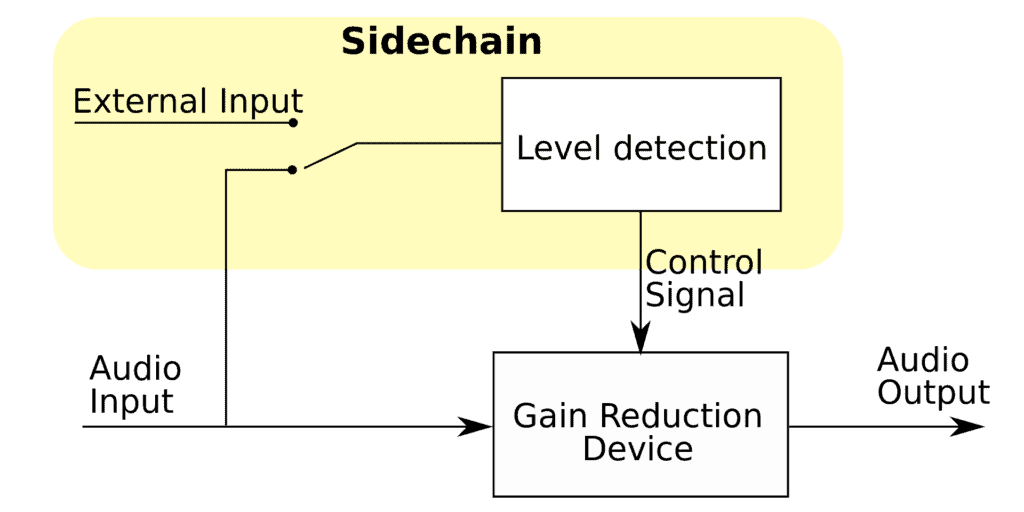
Sidechaining
Y’know how we’ve been talking about how the input signal of a gated track triggers the gate? Well, what if the input signal of another track triggered the gate on a completely different track? This is podracing. Er, I mean sidechaining.
Sidechaining is when you use the output of one track to trigger another track. For example, you can use a kick drum track to control the volume of a synth pad track.
This is done by sending the synth pad track to a separate buss and then adding a gate plugin to that buss. In the gate plugin, turn on the “sidechain” option and link it to the signal of the kick drum.
One way to do this is to sidechain multiple tracks from the same source. For example, let’s say you have a synth pad and a lead melody playing at the same time. You could sidechain both of those tracks from a kick drum track.
Now, when the kick hits, the gate will open and allow the signal to pass through to the buss. This will cause both the synth pad and lead melody to duck in time with the kick, making room for it in the mix.
Gated reverb
Gated reverb is a classic ’80s sound that’s made a comeback in recent years. It’s created by combining a noise gate with a reverb plugin.
Its most famous application is the drum fill on Phil Collins’ In the Air Tonight. Rather than trailing off (like normally processed reverb), the reverb tails of each drum hit are abruptly sucked into a noise gate, creating a really interesting (and now iconic) effect.
(The drum fill happens at 3:37)
Watch this video that excellently demonstrates how to achieve this effect:
Setting it up is pretty simple.
First, add a reverb to your track and crank up the decay time so it sustains for several seconds. Then place a noise gate after the reverb and adjust the threshold so it’s only attenuating the very end of the reverb tail.
This gives you that iconic sound of reverb being cut off abruptly. It works great on drums and percussion but can also be used on guitars, synths, and other sounds.
I’m curious to try this on acoustic guitar… 🤔
Vocal gating
Gating is a great way to clean up vocals and get rid of unwanted noise between phrases. But you can also use it creatively to add interest to your vocal tracks.
One way to do this is to sidechain the gate from a kick drum track. This will cause the gate to open and close in time with the kicks, making the vocals sound like they’re pumping in time with the beat.
Another way to use a gate creatively on vocals is to send the signal to two different plugins (or busses) and use a gate on one of them.
This can create some really interesting results, especially if you process the two signals differently. For example, you could send your signal to a buss with reverb and another buss with a delay. Then use a gate on the reverb buss so it only opens when the delay is going.
You can get some really cool, atmospheric vocal sounds this way.
Auto-panning
Gating can also be used to create some interesting stereo movement in your tracks.
One way to do this is to send the signal you want to pan to a buss and add a gate plugin on that buss. Then, in the gate plugin, turn on the “sidechain” option and select a kick drum track (or any other rhythmic element) as the source.
Now, when the kick hits, the gate will open and allow the signal to pass through to the buss. This will cause the signal to pan from one side to the other in time with the kick.
You can use this on anything – drums, guitars, synth pads, whatever you want. It’s a great way to add some movement and interest to your tracks.
Pro tips on when (or when not) to use a noise gate
It’s not always “the move” (as the kids say) to put a noise gate on a track. Noise gates, when done wrong, can totally suck the air and breath and life out of your recordings.
Here are some pro tips on when and when not to use noise gates on your tracks.
Don’t view noise gates as a way to avoid editing
A big mistake people make when using noise gates, compressors, or any other dynamics processing plugin is that they don’t spend enough time editing their tracks before throwing a gate on them.
Noise gates are not a magic “fix-all” button – they’re just a tool to help you clean up your tracks. If you have a lot of bleed, hiss, or other noise in your recordings, the best way to get rid of it is to edit it out.
Noise gates can help you clean up your tracks, but they’re not a substitute for good editing. So before you reach for the gate plugin, make sure you’ve put in the due diligence editing your track and getting rid of all the unwanted noise.
Be careful of overgating vocals
Gating is a great way to clean up vocals and get rid of unwanted noise between phrases. But be careful not to overdo it, or you’ll end up with choppy, unnatural-sounding vocals.
The key is to find the right balance between getting rid of the noise and preserving the breath and life of the performance.
A good rule of thumb is to start with a fast attack and release time on the gate, and then slowly back off from there until you find the sweet spot.
Final thoughts
Noise gates are a great tool for cleaning up your tracks and getting rid of unwanted noise. But they’re also a great way to add interest and movement to your tracks.
So experiment with them and see what you can come up with. And as always, happy recording!