
A step-by-step tutorial on how to transcribe music
Table of Contents
What you’ll have by the end of this post:
- The best music transcription software and tools
- A step-by-step guide to notating music by ear
- Techniques for analysis from Gordy Haab and 8-bit Music Theory
- A handy checklist for transcribing music
In this blog post, we’ll go over some of the most efficient ways to transcribe and analyze music taken straight from experts like 8-bit Music Theory and Gordy Haab (composer of the Battlefront I and II games).
I’ll then show you how to apply those techniques through a step-by-step transcription and analysis of the Map Theme from Yoshi’s Island.
What does transcribe mean?
Music transcription is the practice of notating, replicating, or otherwise committing to memory existing pieces of music. Transcription in music can apply to melodies, chords, basslines, full orchestral arrangements, and more.
There are certain “tiers” of transcription, such as notating a chord chart, a lead sheet, or a full score.
We’ll get into a number of these in this post.
How do you transcribe music?
Before the internet, the only way musicians could transcribe was with pen, paper, an instrument, and a CD player (or record player!).
The musician would play back a piece or portion of a piece and then attempt to recreate it on their instrument.
Then, those notes would be committed to paper: either onto a formal staff paper or simply the back of a napkin.
Nowadays, there are tons of tools and software available to make transcription easy.
Specifically:
- Notation software – which makes editing and formatting sheet music fast and easy
- Slow-down software – which slows down music while maintaining pitch, making it easier to discern musical elements
- Automatic transcription software – which attempts to analyze audio data to automatically detect pitches. Note that most serious transcribers find this method significantly inaccurate and prefer to transcribe manually
Transcription Software And Tools
Paper & Pen
If you don’t have a computer (or want to channel your inner Mozart), you could go old-school and do the paper and pen method.
I don’t recommend this for absolute beginners, but everyone should at some point in their composing experience learn the skill of writing music by hand – at least according to Bioshock composer Garry Schyman.
If you’d like to go this route, I recommend this very reasonably-priced notebook of manuscript paper. Or you can just print some here.
Beyond just feeling really sophisticated, there are deep ear training benefits to composing game music by hand without the aid of an instrument.
This practice forces you to rely on your mind’s ear. That is to say, when you have a notation software that plays back to you what you’ve transcribed, you’re using “trial-and-error instead of craft,” as Gordy Haab eloquently put it in our interview.
There’s nothing inherently wrong with auditory feedback. As a beginner, I desperately needed it, and probably still need it.
But there are incredible benefits to hearing the music in your head and putting it on paper without the use of an instrument.
If you can master that skill, it will increase your ability to compose “on-the-fly” and do the heavy lifting of arrangement in your mind before sitting down at a piano or DAW.
Music Notation Software
As rewarding as it is to handwrite scores, notation software has lots of advantages over the old-school method.
For one, you can play back your notation to check your work. To the above point, that’s not always a great thing, but for me just starting out, it was crucial.
I learned music by ear and had zero experience reading notation, so for my first few transcriptions, this constant feedback was essential and surely prevented many errors.
Transcription software keeps things very neat and tidy, and you can easily delete, replace, copy, paste, shorten or otherwise manipulate note data.
These alterations take lots of erasing and rewriting in the old-school method but can be done with a few clicks in most programs.
Also, most programs won’t let you exceed your allotted number of beats per measure, adding an extra layer of tutelage as you learn beat values and rhythms.
MuseScore is a free, open-source notation program. If you don’t have it, download it right now. It’s amazing.
The industry standard for professional-grade, concert-ready sheet music is probably Sibelius, followed closely by Finale, but both have a hefty price tag for hobbyists and those starting out on their transcription journey.
Note: Avid recently put out a “lite” version of Sibelius that only allows 4 staves at once. I have not explored this yet, but I’m planning to soon.
If you’re interested, download it for free here and let me know how you like it.
For what it’s worth, I haven’t come across a single transcription task that MuseScore couldn’t handle with ease. There are some… odd design quirks that take some getting used to, but it is free after all.
They’ve also got a thriving online community and a development team that really listens in order to make the software better.
As with most open-source programs, the forums are brimming with passionate MuseScore users. The community is quick to answer tech support questions and take feedback.
I recently discovered a browser-based notation app called Flat.io. The technological landscape is rapidly moving to a cloud- and browser-based philosophy, so this is definitely the future.
I haven’t been able to vet out this particular tool, but it looks pretty rad, especially the ability to collaborate on a score online.
Whatever software you choose is ultimately inconsequential, as they all do the same things with different workflows.
An Instrument
As noted above, transcribing without the aid of an instrument is great ear training practice, but it’s not easy and might discourage you if you’re new at transcription.
For this reason, I recommend using an instrument like a guitar or piano for your first dozen or so transcriptions. At least, until you feel comfortable notating things by ear.
Sometimes, when I actually see how the song plays out on a piano or guitar, this also helps me in the chord-naming and analysis portion.
MuseScore allows input from a MIDI keyboard, which makes things even faster if you have one. I usually notate everything using my MIDI keyboard, but doing it with a computer keyboard is quite user-friendly as well.
YouTube
Just about any song can be found for free on YouTube. The real benefit comes from some handy features that let you manipulate playback for transcription.
Click the Settings icon on any YouTube video to adjust the speed of the video. This can be helpful when trying to pick out notes in a blazingly fast solo or discerning tricky intervals.
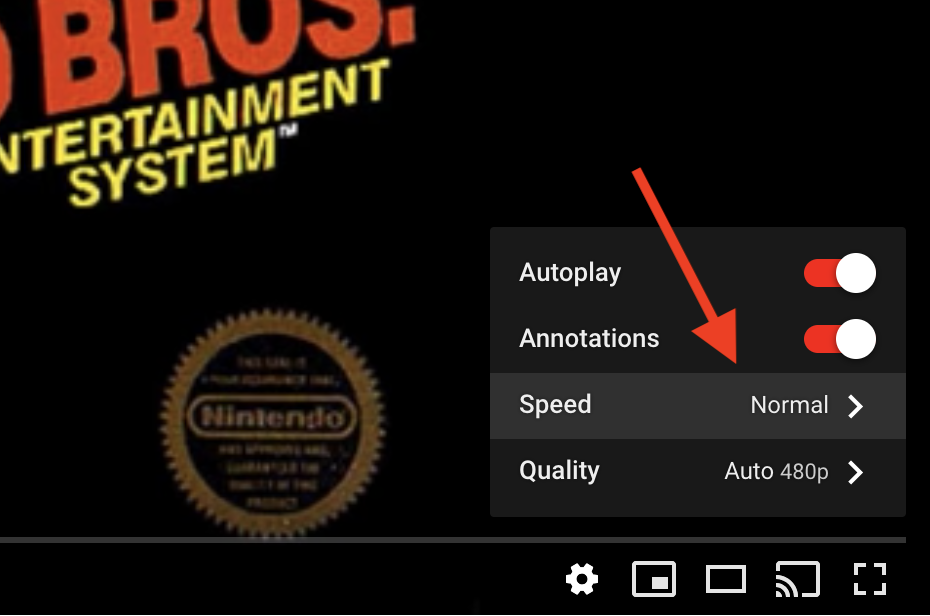
You can also use keys like the spacebar to pause and play and the arrow keys to skip back and forth. The speed adjustment keyboard shortcut is Shift + < for slower playback and Shift + > for faster playback.
Technically, with YouTube on one side of your screen and notation program on the other, you’d be all set to handle just about any transcription task thrown your way.
In fact, in his transcription live stream of the Dolphin Shoals sax solo, that’s all 8-bit uses.
TuneTranscriber
Taking this concept to the next level is TuneTranscriber, one of the most helpful tools I’ve ever discovered.
It’s a free web app that allows you to upload a song from an MP3 file, or even more conveniently, a YouTube video.
Once uploaded, there are tons of ways to manipulate the audio to make it easier to transcribe.

In addition to slowing it down or speeding it up without changing pitch, you can also set specific loop points and cycle them with breaks of silence in between each playthrough.
These guys really thought of everything.
This is just scratching the surface on everything TuneTranscriber can do, and although there’s a paid version, the free version is packed full of everything you might need for transcription.
For really difficult songs where YouTube skipping won’t cut it, look no further.
Cirrus Retro
There are lots of platforms that let you listen to video game music online, but Cirrus Retro has a game-changing (heh) feature: the ability to mute and solo system channels.
Ever wonder how Angel Island Zone from Sonic 3 was so intricately layered?
This tool allows you to solo each instrument for precise transcription and analysis. This goes for any game on any retro system: the Super Nintendo, Gameboy, Gameboy Advance, Sega Genesis, NES, even the Dreamcast.
Some may call it cheating, but the ultimate goal isn’t to be the best transcriber but to have an accurate transcription (and to try to have a little fun).
If there’s a particular tool you use to transcribe (I know there are a ton out there), please let me know in the comments below.
If you followed my suggested action items in the last blog post, you should have picked out a piece that you’ve listened to several times and are chomping at the bit to transcribe.
Download your transcription software of choice, load it up, and let’s get started!
Let’s transcribe Yoshi’s Island! A step-by-step guide
If transcription is an arduous hike, analyzing that transcription is the breathtaking view at the top of the mountain.
There’s nothing better than transcribing a piece and diving inside the mind of the composer, plumbing the depths of what makes it great.
It feels like digging for buried treasure and is almost as enjoyable as playing the music on an instrument.
Here’s the step-by-step process we’ll be going over as we transcribe and analyze a piece together:
- Stating your goals and hypothesis
- Preparing your transcription
- Transcribing a lead sheet
- Reducing a lead sheet (optional)
- Naming the chords
- Analyzing your finished transcription
- Remaking the piece (optional)
Stating your goals and hypothesis
I’ve found that going into a transcription session with a distinct goal in mind is the best way to get the most out of the entire process. What do I mean by “goal”?
Well, as I alluded to in the action items of the last post, it’s important to ask yourself why you want to transcribe the piece you’ve chosen. Obviously, there are objective reasons other than “it sounds cool.”
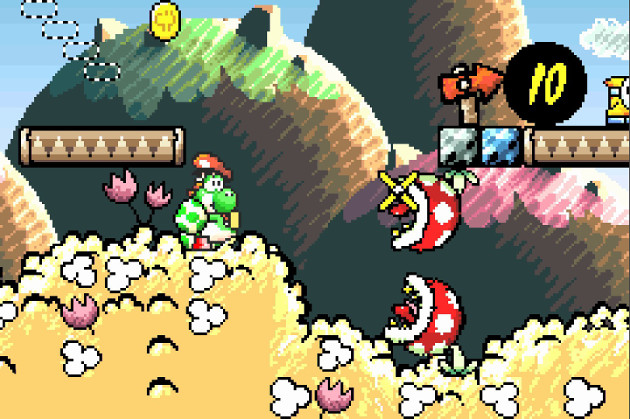
I’ll tell you why I want to transcribe the Yoshi’s Island Map Theme. Well, for one, it’s short and serves as a succinct case study for transcription.
But if I were to dive deeper, I’d say my goal is to figure out how the underlying harmony of the piece (the chord changes, really) support the aesthetic of Yoshi’s Island. The game is hand-drawn, childlike, and upbeat.
Yet, it still retains that signature Koji Kondo groove that’s present in all the previous Mario titles.
My hypothesis is that this has something to do with the playful instrumentation. Remember the scientific method from elementary school?
Like any good scientist, our goal is to conduct experiments that either prove or disprove our hypothesis.
As you listen to your piece a few times, jot down these thoughts on a piece of paper or empty text document. With our goal and hypothesis recorded, we’re ready to prepare our transcription!
Preparing Your Transcription
Before you dive into your notation program of choice, there are a few things you can do to make your life easier as a transcriber. I recommend figuring out three key pieces of musical data before transcribing:
Time signature
It’s important to understand your time signature before you start transcribing, especially when dealing with odd meters like 3/4 or 6/8 (or even weirder stuff than that).
Most video game music is in 4/4 time, but it’s important to listen to the song, count the beats in each measure and make a mental note of this going into your transcription process.
What I like to do is tap out what I believe the time signature is with my foot (in the Map Theme it’s 4/4), and then tap out the melody with my hand on my desk.
This takes a bit of practice, but I’ve successfully confirmed the song to be in 4/4 time. As a side note, this tapping exercise has also revealed that the melody is heavily syncopated (emphases are placed on the weak beats or in between beats).
I’ll keep this in mind for the analysis phase.
Key signature
If you can figure out what key your song is in before you start transcribing, it will save you a ton of grief and potentially spare you from dealing with unnecessary accidentals (sharps and flats).
Finding the tonic (key center) takes a little bit of ear training, but most often, it’s the first chord in the form. Playing along with the song on a piano or guitar is the best way to figure out this out.
I wish I could help more here, but the best I can offer is when you play or sing a note that feels like “home,” that is likely the tonic and therefore the key center.
If you’re having trouble, there are a few other ways to figure out the tonic, as illustrated by talented saxophonist and YouTuber Jeff Schneider in this video.
Tempo and form
If you’re using software, you obviously want the tempo of your transcription project to be as similar as possible to the tempo of the song.
I love this Tap Tempo tool, which not only allows me to tap in tempos but also keeps track of my beats (this will come in handy soon).
The first thing I usually do is pull up my song of choice in a separate window on YouTube or TuneTranscriber.
This next part requires a bit of keyboard and mouse finesse. Put your mouse cursor into the tap tempo text box on the BPM counter tool, then click on the YouTube video to begin playback.
Quickly click back to the BPM counter and wait for the form to loop (most YouTube videos have looping versions of these songs).
As the song loops back to the beginning, I begin tapping my spacebar to the beat, until the song reaches completion or the loop point once again.
If you miss a few beat taps here or there, it’s not a big deal. As long as you get the estimated amount of beat taps, you’ll be set to start outlining the form in your notation software.
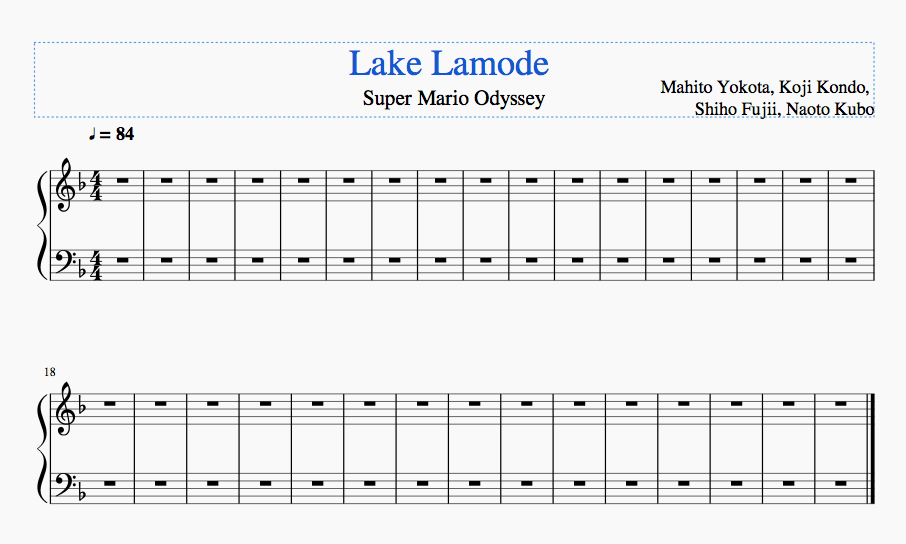
Here are my results from the Yoshi’s Island Map Theme:
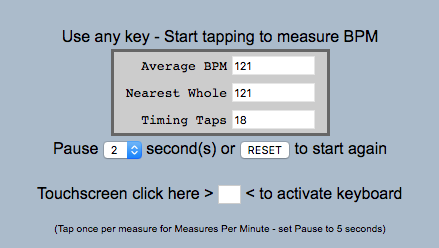
Using this method, I tapped out 18 beats in the form, with an average tempo of 121 BPM (as seen in the screen capture).
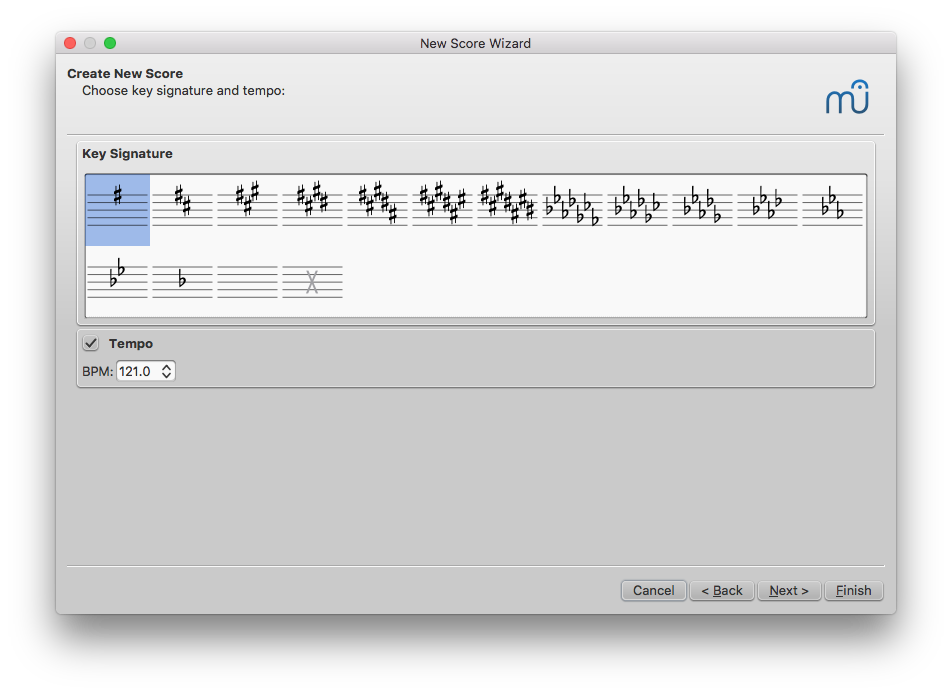
Now, if you followed the above steps, you should know your time signature, which in the case of this piece, is 4/4.
Logically, if there are four beats in a measure, we can divide our total number of beats by 4 and the result will be how many measures we need to create for the form. In this case, 18/4 = 4.5.
That .5 measure likely accounts for one measure of 2/4 that acts as a turnaround for the loop.
So now, when MuseScore or Sibelius prompts us to give some rudimentary information about our score, we’re set up for success knowing:
- The time signature is 4/4
- The key center is G (one sharp)
- The BPM is 121
- There are 4 measures of 4/4 and one measure of 2/4 at the end
It drastically speeds up your workflow to have a clear blueprint of the song from start to finish. This saves your creative energy for the hard work of transcription and just feels great.
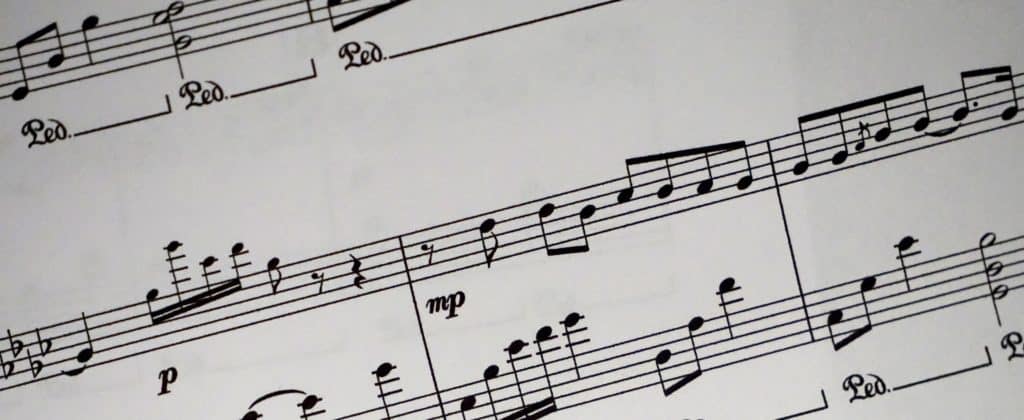
Transcribing a lead sheet
A lead sheet is essentially a piece of music reduced to its core musical elements.
This means it contains only the most basic rhythmic, harmonic, and melodic content needed to communicate the “essence” of the piece.
This is a perfect place to start for transcribers, and Gordy Haab mentioned this is how he started transcribing the Star Wars score for his work on the Battlefront games.
It’s easy to get lost in the weeds transcribing arpeggios and inner voices. What we want is the core musical data of the piece, and then we can decide if we want to go further from there.
During our interview, Gordy outlined a very helpful process for creating a lead sheet.
Let’s follow his process together as I transcribe the Map Theme from Yoshi’s Island.
Check out the Transcription and Analysis Cheat Sheet for a quick reference you can have by your side every time you transcribe.
First, transcribe the melody
9 times out of 10, the most obvious thing you’ll hear in a piece is the melody. Transcribing the melody first is a great way to warm up your ears for the more challenging inner voices.
Use TuneTranscriber or YouTube to play the song (utilizing the slow-down function, if need be), and transcribe the melody.
Starting out, I recommend taking it beat-by-beat, not measure-by-measure. Slow down the piece until you can count out “one – ee – and – ah -” at a comfortable pace.
“One” marks the beginning of the beat, “and” marks the middle point of the beat (eighth note), and the “ee” and “ah” mark the 16th note subdivisions of the beat.
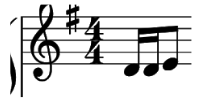
I’m going to use this practice to count out the first beat of the Yoshi’s Island theme. First, I’ll slow it down, and then count it out. I notice when I count it out that there are notes on the “one – ee – and” but not the final 16th note “ah.”
“Boppa Ba Ba!”
I’d notate that like this:
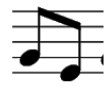
The second measure, counting nice and slow, hits the melody on these beats:
“Two – ee – and – ah”
This straight eighth note pair provides a nice contrast from the syncopation in both the previous and subsequent measure.
I’d notate it like this:
If you need a refresher on how to write musical notation properly, I recommend this helpful video by 12tone.
Going beat-by-beat, slowly but surely, I end up with this transcribed melody:

Second, transcribe the harmony
The next step in Gordy’s process is to transcribe the chords.
For old systems like the SNES, NES, or Genesis, chords can often be voiced in unusual or especially funky ways due to the limitations of the hardware.
Because of this, it’s often a good idea to transcribe each voice separately, starting with the bass note.
This kind of goes beyond the bounds of a lead sheet, but if you’re not sure what the chords are, it can be helpful to get everything down “on paper” and analyze the harmony later.
Here’s the Map Theme with the bass transcribed. Note how there are no chords labels yet because many of the inner voices inform what chords we’ll be naming.

Third, transcribe the inner voices
The last step would be transcribing some of those hard-to-hear inner voices, which should be a bit easier now that you have the top boundary (the melody) and the bottom boundary (the bassline) transcribed.
It’s especially helpful to use an instrument as you figure out these pitches, and don’t be afraid to reference Game Music Appreciation (for retro tunes) to isolate the channels to double-check your accuracy.
This is the part of transcription that will really train your inner ear and push you to your musical limits. It’s hard work!
Here’s the full Map Theme with the inner voices transcribed. Full disclosure, I referenced Game Music Appreciation to double-check my work. No shame!

Sidenote: Reducing to a Lead Sheet
It’s important to note here that if you’re transcribing an orchestral piece for the purpose of musical analysis, there’s an extra step between the transcription and analysis phases called reduction.
Let’s say you want to transcribe the Main Title Theme from Bioshock. You meticulously listen to each section of the orchestra and transcribe as you go.
The next thing you know, you have 16+ staves with more notes than your brain can comprehend at once.

- Don’t be a hero and try to analyze this as-is. Reduce it!
(This also applies to VGM pieces that include lots of complex parts, voices, or otherwise convoluted arrangement choices.)
How in the world can you analyze something like this? Answer: reduce it.
I’m pulling this straight from Wikipedia:
“In music, a reduction is an arrangement or transcription of an existing score or composition in which complexity is lessened to make analysis, performance, or practice easier or clearer; the number of parts may be reduced or rhythm may be simplified, such as through the use of block chords.”
When Gordy Haab was charged to write music for the new Star Wars Battlefront series, he knew he needed to dive deep into the mind of John Williams through diligent transcription and reduction.
What he already knew, and what you’ll find if you practice this craft, is that many sections of an orchestra are playing the same thing. Sometimes in octaves, sometimes in unison.
“[Reduction] is like stripping a house down to its blueprint,” he said. “It’s the best way to truly understand how an orchestral piece functions.”
Trying to analyze a full orchestral score, especially when dealing with instruments like the trumpet and french horn that are transposed into other keys, can be a real headache without reduction.

Plus, there’s no better way to hone your orchestral arrangement chops than by reducing orchestral pieces and studying how they work.
Here’s Gordy’s process for reduction, taken straight from our interview:
- Start by combining all the winds (the first section in typical score order)
- Reduce each section sequentially (percussion is mostly just for color, but take note of which parts percussion is accenting)
- Continue until you reduce the score down to one piano grand staff, maybe two at the most
- Sometimes ornamentations like woodwind runs will disappear. That’s okay, you’re trying to capture the essential harmonic and melodic information of the piece
“I had assignments in university where I had to reduce scores down to the piano. You learn a ton about orchestration that way,” Gordy said.
“For example, I learned in John Williams’ music that the 4th trumpet would often double french horns playing in unison. This subtle shift in timbre is part of what makes Williams’ music great. I would’ve never noticed that if I hadn’t reduced it down to the simple ingredients of what’s being played regardless of the instruments playing them.”
He also recommended a clever exercise for composers looking to build take their arrangement skills to the next level.
“One thing I’ll do is actually break it back out to full orchestra after I’ve reduced it. This time, I’m orchestrating it my way without regard for the original. Then, I compare the two. It’s just a great exercise to hone your craft.”
Okay, back to our Map Theme!
Identifying and Naming Chord Tones
Now that we’ve got our raw musical data on paper, it’s time to name some chords. Why bother naming chords, you ask?
Without chords, it’s a challenge to discern harmonic patterns.
Some chord names are obvious, but I found myself majorly tripped up by this step when I first started transcribing.
Which pitches make up the chord and which are just part of the melody? How do I know if a bar needs one chord, two chords, or more? How can I “feel” the changes and notate them accordingly?
8-bit Music Theory analyzes video game music for a living. As such, he’s developed a solid chord-naming process.
You’ll soon develop your own process as you transcribe more and more, but for now, let’s follow Mr. Theory as a starting point (remember how much I love copying?).
Which pitches make up the harmony of the bar?
One of the biggest challenges in the harmonic analysis of transcription is deciphering which notes in a composition make up the underlying harmony, and which notes are melodic embellishments.
One of the helpful ways to crack this code is to organize notes in “stacks of thirds,” or logical groupings that help better illuminate their function.
For a brief refresher, a third is an interval (two notes) three letter names apart. For example, A to C is a minor 3rd, F# to A# is a major 3rd, and D♭ to F is a major 3rd.
The reason I know each of these are either minor or major is a mixture of scale knowledge (what makes up the A, F#, and D♭ minor and major scales), but also how minor and major thirds are formed.
The formula for major thirds is whole step – whole step. Meaning you move one whole step from D to E♭, then one more whole step from E♭ to F. That’s why D♭ to F is a major 3rd.
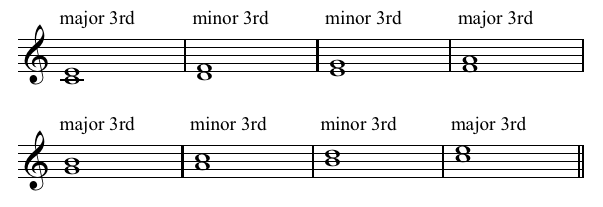
Likewise, the formula for minor 3rds is whole step – half step. Which is why in the case of A to C, we move one whole step from A to B, then one half step from B to C. There’s our minor 3rd!
Sidenote: If all of these sounds completely foreign to you, I’d recommend brushing up on at least the basics of chord construction here
8-bit graciously opened the kimono on his process for deciding how to prioritize certain notes as chord tones. Here’s what he told me:
- Look at a measure and see if a chord jumps out at you (sometimes it’s obvious)
- If it’s not obvious, take all of the notes in the bar and see if you can arrange them in a way that makes either a scale or chord. Sometimes it can be helpful to write out the bass note as “1,” and the subsequent notes as scale degrees relating back to that note. (C, F#, G, D would be written as 1, #4, 5, 9.)
- After rearranging these notes, look for key intervals that define chord quality like 3rds or 7ths. If you can’t find any of those, try another pitch as the bass note.
- Still no luck? Take only the notes that are emphasized (usually found on the beat, but not always) and repeat steps 2 and 3 with just these notes
- If this still doesn’t work, isolate just the notes found on beats 1 and 3 (strong beats) and repeat step 2 and 1 with just these notes
- If this somehow still doesn’t work, then you probably need two chord symbols per bar
Following this process will help you logically group together pitches. Some pieces demand one chord symbol per bar, others demand two.
The Map Theme actually feels best with four chord changes, as we’ll explore soon. A lot of this comes with experience, practice, and “feeling” the changes.
Sidenote: for those of you who play guitar or piano, I often think to myself as I’m transcribing, “if I were performing this song live, where would it feel appropriate to change chords?”
It’s kind of a subjective method, but this has gotten me out of many tricky chord-naming situations.
Want a handy guide as you transcribe and analyze your pieces? I made this Transcription, Reduction, and Analysis Cheat Sheet so you can have a step-by-step checklist the next time you transcribe!
Chord Naming Process
Once you understand how you might group your pitches together, it’s time to name the chords themselves.
The priority for naming chords is usually as follows (extrapolated from this site):
- Start with the root of the chord
- If the third degree is minor, write m next to it, otherwise, write nothing
- If the seventh degree is minor, put 7. If it is major put maj7. Otherwise, write nothing
- If there is no 3rd degree, look for a 2 or a 4, and write sus4 or sus2 after the 7
- If the fifth degree is perfect, write nothing. If it is diminished, write ♭5, if it is augmented write ♯5. Sometimes a chord may have both ♭5 and ♯5.
- Next, the ninth degree. If it is perfect, erase the 7 and write a 9 in its place. If it is minor, write ♭9. If no 7 is included, write add9.
- Next, the eleventh degree. If it is perfect, erase the 7 or 9 and write an 11 in its place. If it is augmented, put ♯11. If no 7 is included, write add11.
- Next, the thirteenth degree. If it is perfect, erase the 7, 9, 0r 11 and write a 13 in its place. If it is minor, put ♭13. If no 7 is included, write add13.
Using this method, we have successfully identified and named this chord as Am7! Nice!
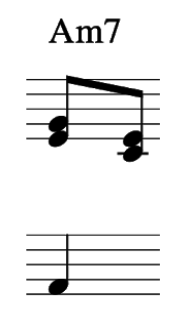
However, not all chords are going to be this simple. For example, take the chord in this bar.
Let’s follow 8-bit’s process and see what we find.
When we spell out the pitches, here’s what we get (along with their corresponding scale degrees):
D, E, C, B
1, 2, 7, 13
Now let’s look for 3rds, and then 7ths. Hmm, so there aren’t any 3rds, and there’s a 7th in there, so our initial impulse might be to label this as a D7 chord.
But upon further examination, we also see that B in there, making it a D13. But then there’s also no 3rd in there, so we need to make sure that’s reflected in the chord.
3rds are super important because they define the quality (either major or minor) of a chord. Right now, this chord could technically be either, though it’s most likely major.
So we might end up with something like D13sus2, which is a very uncommon chord and likely won’t help us much in our analysis phase.
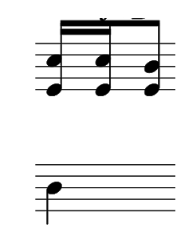
Sometimes it’s good to back up and not necessarily start at the bass note, but split up the “right and left hands” so to speak, and use slash chords.
If a chord is built on top of a bass note clearly distinct in quality from the rest of the chord, you may choose to write a slash chord.
In the case of the above chord, the right hand is playing 2/3 of a Cmaj7 chord (the bold pitches), and the bass is hitting a D. Let’s take another look:
D, (E, C, B)
1, 2, 7, 13
A Cmaj7 chord is made up of C, E, G, and B.
All of those pitch requirements are met in this chord (aside from the implied 5th, G, which we don’t really need).
Because of this, my preference is to write this chord as Cmaj7/D.
This also simplifies things in a live musical setting where a musician or group of musicians can separate the bass from the other voices of the chord. It makes at-a-glance analysis a lot easier, as well.
Helpful chord identifying tools
I recommend that before you turn to any online tools, you put on your thinking cap and give the above process a college try.
But like I said earlier, the goal is to have an accurate transcription. So if you’re absolutely stumped or just want to check your work (I recommend it), punch your pitches into this Chord Identifier tool.
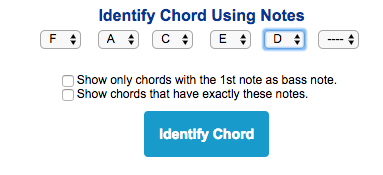
When it spits out your answer, don’t just enter it into your transcription. Click on the chord and study why that chord is named that way, and what went wrong with your initial assessment. It’s the best way to grow as a music theorist and chord namer!
Some chords are open to interpretation
Don’t let anybody tell you there’s only one way to name chords. This is where the process of musical analysis gets grey and subjective.
I’ll give you an example.
The other day I was transcribing the Muda Kingdom theme from Super Mario Land (great tune). The first chord change sees the bass shifting from the I (A) to the IV (D), with the melody hitting the B, C# and A.
On first blush, these pitches lined up (D, B, C#, A) might tempt me to label the chord as an Dmaj13.
But when I played the cluster chord on the keyboard while singing the melody (a helpful exercise), I felt like it sounded more natural as a Dmaj7. I resigned that B the melody hits to a melodic embellishment, not part of the chord itself.
This is very much a “lead sheet” philosophy. If there are no altered tones (♭9, #11, etc.), that fundamentally change the tonal color of the chord, it’s often best to name the chord a major 7 or dominant 7. This leaves the embellishments up to the discretion of the player or the melody.
What do you think? You may disagree, as I imagine some people love to label exactly what the pitches are implying (including embellishments). I tend to have a looser view of this, especially because I’ve played with lots of bands and like to leave room for surprises. 🙂
Roman Numeral Analysis
My favorite part of analyzing music is conducting a Roman Numeral Analysis. If transcription is the arduous hike up the mountain, analysis the view from the mountaintop, Roman Numeral Analysis is the selfie you take to make all your friends jealous.
After I’m confident my chord symbols are as accurate as they’ll ever be, I print out my sheet music and start marking things up with a pen.
Whatever key the song is in, I notate as a “one” chord. Except I don’t write “one,” I write “I” or “i,” depending on if the song is in a major or minor key (uppercase for major, lowercase for minor).
From there, every scale degree relates back to that I chord in some way. For example, if I’m back in the key of C major, I’d label all Dm chords “ii,” all G7 chords “V7,” and all F major chords “IV.”
![]()
Each Roman numeral relates back to how these chords function in relation to the tonic chord.
Musictheory.net has a thorough, concise tutorial on Roman Numeral Analysis here. I highly recommend you check it out!
The reason why this is important is that I’m not so much concerned with the actual chords, but their function. This is what Roman Numeral Analysis helps me discover.
A ii – V – I cadence has the same function in every key, and if you want to get at the underlying skeleton of a song, this is the best way to do it.
I can’t overstate how important this is in learning genre-specific cliches and how they’re used in real compositions, as well as the theory behind how tonal music works.
Using the circle of fifths
The circle of fifths and I have gone through a rocky relationship. From slight interest to mild indifference to angry contention, to true love.
The Circle really does contain everything you need to know about harmonic analysis and more. It’s like the golden ratio or yin-yang of music.
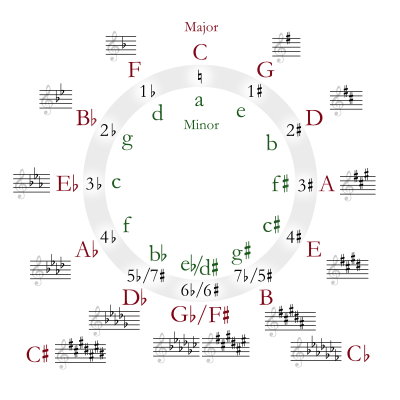
Everything in perfect balance. Everything in harmony and symmetry.
I could write a whole blog post about how to use it for analysis (and I will), but for now, here are a few basic things to know as you reference this amazing tool in your analysis process:
- The circle moves clockwise in fifths, and counter-clockwise in fourths (each chord resolves to the chord in the counterclockwise direction)
- The relative minor of each key is three steps to the right of a given chord (Am is three steps from C)
- Drawing a line straight across the circle produces a tritone (C to F#)
- The chromatic mediant chord (often used in film scores) is three steps to the left of a given chord (C to Eb)
- Starting five steps to the right of a chord and sequentially moving counterclockwise back to the key center will produce the very popular and effective viio – iii – vi – ii – V7 – I chord progression (Bo, Em, Am, Dm, G7, C)
- Drawing an equilateral triangle starting at the key center produces a Coltrane Matrix (chromatic third relations), a super spicy jazz progression popularized by John Coltrane himself
I could go on and on about how great of a tool this is for writing, how many creative blocks this thing has rescued me from, and how I discover new things about it every day.
I’ll restrain myself and save that for another post.
I encourage you to start viewing the music you analyze through the lens of the Circle of Fifths.
I often reference it as I’m doing a Roman Numeral Analysis to make sure I’m accurate.
After the analysis, I’ll look through the circle of fifths to see what patterns the song follows.
For example, when I analyzed the Menu Themes from the NES and SNES Classic, I made a video about how they traversed the circle of fifths in super unique ways (and even composed a piece in the same style).
Music Transcription Tips
In addition to studying the piece’s harmonic language and chord progression, there are many other ways to analyze a transcribed piece of music.
After naming the chords, I usually follow this process:
- Study the “line” of each voice (this is usually called voice leading) for patterns
- Try to find motifs that recur in the music and figure out how they function (I usually look for similar rhythms first, then similar pitches)
- Study the rhythms of the piece and what makes them work. The best video game composers often utilize syncopation (placing emphasis on the weak beats) to drive a song forward
Analyzing your finished transcription
So now that our piece is transcribed, our chords are named, and our Roman Numeral Analysis is complete, it’s time to test our hypothesis against our findings.
If you’ll recall from many paragraphs back, my goal for this piece was to understand how it supported the childlike aesthetic of Yoshi’s Island while still retaining that jazzy, catchy Mario sound.
My hypothesis is that it was because of the instrumentation (percussive, plucky sounds).
When I examine the bassline of the piece, there is a feeling of rising up the scale, then falling down the scale, then rising up again and falling down again with a little twist (I’ll get to that in a second).
Many nursery rhymes have elements (either melodic or harmonic) that ascend the scale in simple, small steps. This makes it easier for children to sing. This is why combined with my theory on instrumentation, I believe it has a child-like sound.
But about that signature Mario catchiness? Remember how I said when I tapped out the tempo and melody, I noticed the tune was extremely syncopated? This is a Koji Kondo staple, and accenting rhythms in between beats or on weak beats is an effective way to drive a piece forward.
It also has the benefit of making melodies really catchy. Is it just me, or when you play this adorable tune, are you tempted to bob your head and tap your foot? That’s the syncopation working its magic.
If we were to straighten out these notes, the song would sound dry, boring, and not near as catchy. The straight, even bass notes act as the “straight man” against the wildly syncopated melody in the right hand.
Koji doesn’t stop there, though. To put a little more stank on this tune, he borrows a B♭from the parallel key of G minor, substituting it for the B natural we’ve grown accustomed to. The result is a slightly-bluesy, delightfully unexpected shot of funkiness.

When I was processing this piece with 8-bit, he made the comment, “It’s a funky melody with a baby-like nursery rhyme in the bass. Perfect for Baby Mario riding on Yoshi’s back.”
Boom. Analyzed.
Going the extra mile – remaking the finished piece
If you want to go above and beyond, Sam Matla from EDMProd recommends actually recreating the song you’ve transcribed, instruments and all.
This is hands-down the best way to intentionally practice and perfect your craft. It touches on all aspects of the music production cycle. Not only the theory, arrangement, and composition, but also the sound design, mixing, and mastering.
Warning: this is not for the faint of heart. It’s time-consuming and extremely challenging trying to match up your work with that of a distinct piece of music.
However, if you’re looking for a way to accelerate your growth as a music theorist, composer, arranger, and producer, there truly is no better way.
If you’re not down for something this labor intensive, I recommend creating a song with a similar style, tempo, and form as the one you’re analyzing.
I do this very thing in the aforementioned video on recreating NES and SNES Classic Menu Themes.
Your objectives:
- Download MuseScore or similar notation software
- Transcribe one of your favorite video game songs using the transcription workflow cheat sheet
- Name the chords to the best of your ability
- Analyze the piece with a goal or hypothesis in mind: “this piece sounds scary because of the spooky theremin and minor key dissonances.”
- Do a Roman Numeral Analysis using the circle of fifths as reference
- Write down at least three things you learn about how this piece functions, evokes a certain mood or supports gameplay
- Confirm or deny your hypothesis and write down your findings. “This piece is scary because of the theremin and excessive use of diminished chords, as well as low brass.”
As you can tell, I’m passionate about transcription. I’ve not only heard it touted as invaluable by every composer I’ve spoken to on my podcast, but I’ve also experienced its benefits firsthand.
My hope is that we don’t eschew the traditions, cliches, and composers in favor of the futile quest for “originality,” but humbly seek to emulate them through imitation.
I hope this blog post has inspired you to see transcription in a new light and to realize its creative benefits.